© 2025 Center for Digital Innovation and AI
- Page d'accueil
- Gestion de son espace
- Activities
- Activité TestCréation de l'activité testFeeding the question bankParamétrage d'un test en ligne à distanceParamétrage d'un test en ligne en présentielAdding question to quiz manuallyRandomly add questions to quizBlock concurrent connectionsUser overridesMélanger les questions d'une ou plusieurs sectionsin case of connection lost
- Notification
- Online Evaluation Checklist
L’activité Feedback est normalement utilisée afin de faire une sorte d’évaluation du cours par les étudiants. L’évaluation peut être anonyme quand l’anonymat est activé lors du paramétrage de l’activité Feedback.
Il est recommandé de suivre les étapes ci-dessous pour assurer la bonne démarche de l’implémentation de l’activité « Feedback ».
- Tout d’abord, il faut identifier les éléments ci-dessous de l’activité « Feedback » (dans un fichier Word)
- Le but de cette activité (i.e. pourquoi utiliser « Feedback »).
- The title and a brief description of this activity.
- The questions of this Feedback, their types (i.e. short answer, multiple choice etc.), if they are required or not, whether they must be categorized by labels as well as the sequencing of the questions (i.e. question 1, question 2, etc.).
- Questions are displayed on a single page or not (ie the Feedback design). If not, specify the corresponding questions for each page.
- If the Feedback preserves anonymity (i.e. you cannot identify which response corresponds to which student).
- The opening and closing dates of this activity.
- Whether multiple discounts are allowed (i.e. students can answer questions multiple times) or not. If multiple discounts are allowed, then you will receive the last discount as a final response.
- Whether the analysis page is displayed or not. If the page is displayed, the results will be accessible to all participants who responded, note that the results are anonymous.
- After having identified the elements of this activity, we move on to the application. You then have to create the Feedback activity, configure it, feed it with questions and work on its design.
- Start the Feedback activity for students to answer questions. After launch, you can view student responses. At the end of the activity, you can download the answers in an Excel file.
Remark : L’activité ne peut plus être modifiée dès qu’un seul étudiant fournit une réponse. C’est pour cela, et comme bonne pratique, il faut s’assurer qu’il n’y aucune modification à apporter à l’activité, avant de la lancer. Cependant, si une modification s’impose (par exemple, modifier une question, ajouter une question, etc.), dans ce cas, il faut supprimer toutes les réponses des étudiants et relancer l’activité de nouveau.
A. CREATING THE FEEDBACK ACTIVITY IN YOUR COURSE
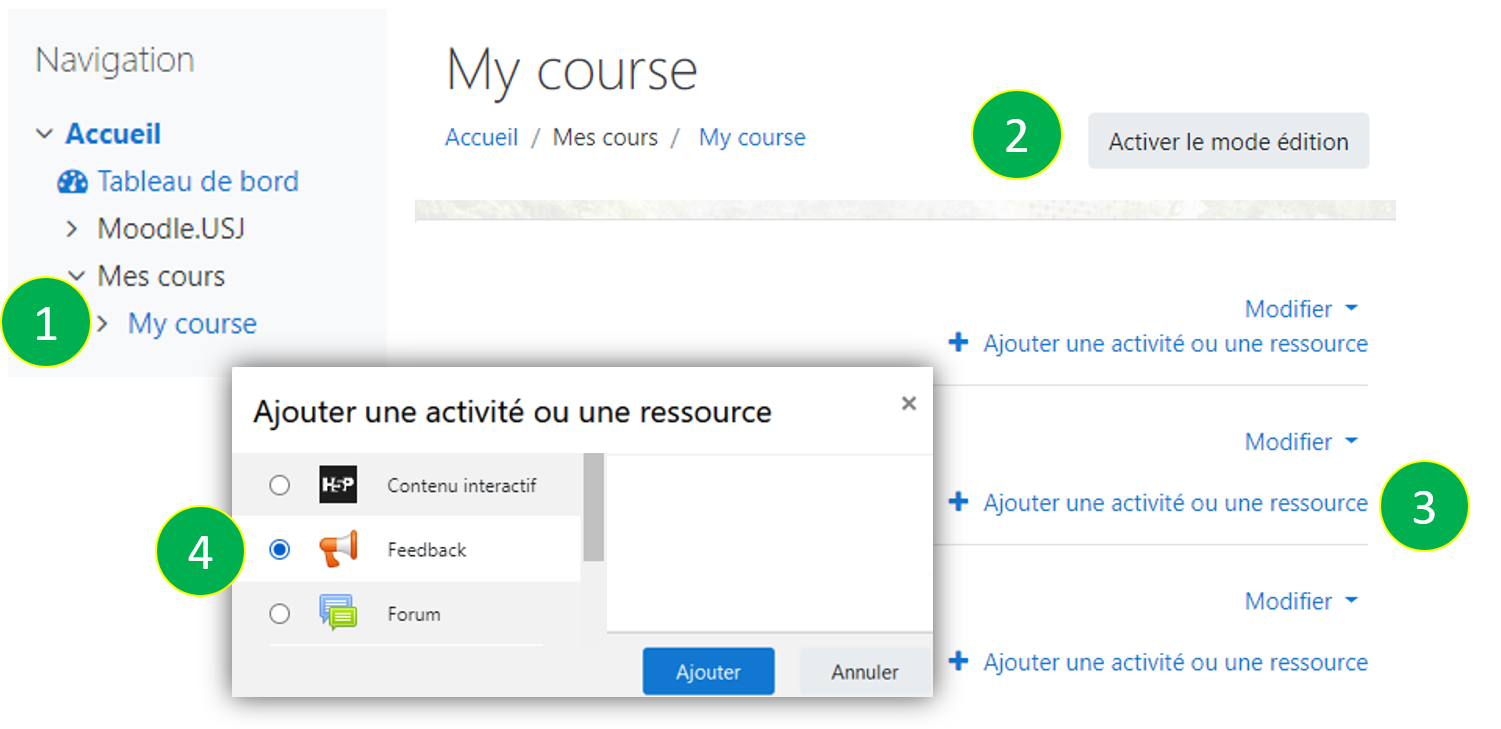
- Access your course by clicking on “My courses” label in the “Navigation” block then select your course
- Activate the editing mode by clicking on the "Turn Editing On"
- Create the “Feedback” activity , by clicking on “Add an activity or a resource”
- Choose “Feedback” and click on the “Add” button.
B. SETTINGS OF THE FEEDBACK ACTIVITY
To configure the Feedback activity, follow the steps below :
GENERAL
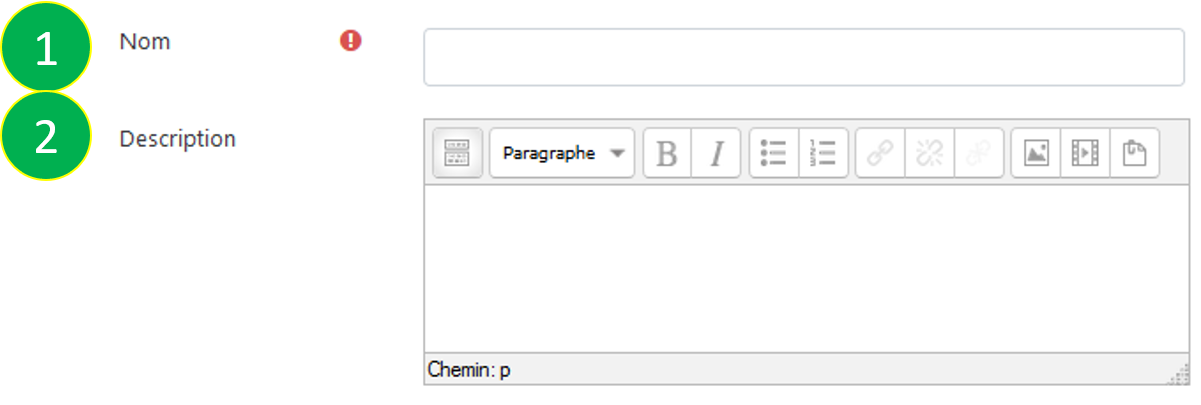
- Saisissez un nom à votre activité
- Saisissez une description à votre activité, qui devrait inclure des instructions précises pour les étudiants
AVAILABLILITY
This feature allows you to schedule a period of time during which students can respond to feedback.
- Activez le champ « Permettre les réponses dès le » en cochant la case “Activer” et puis saisissez la date de votre choix. Les étudiants ne pourront pas répondre au Feedback avant cette date. Si vous n’activez pas ce champ, les étudiants vont pouvoir accéder au Feedback tout le temps.
- Activez le « Permettre les réponses jusqu’au » en cochant la case “Activer” et puis saisissez la date de votre choix. Les étudiants ne pourront pas répondre au Feedback après cette date. Si vous n’activez pas ce champ, les étudiants vont pouvoir accéder au Feedback tout le temps.

QUESTION AND SUBMISSION SETTINGS
- Choose of the following options :
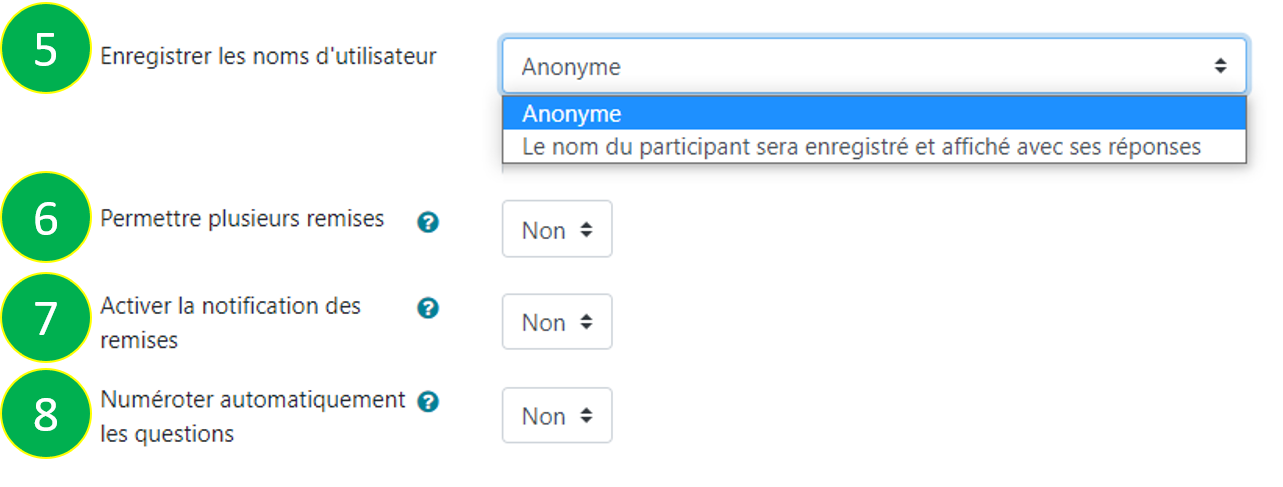
- Anonymous
- User's name will be logged and shown with answers (in this case only the teacher can know who answered, while the students cannot know who answered even if they are given access to the results.)
- You can allow multiple submissions, but you will only see the last one.
- You can enable notification of submissions.
- You can auto number questions for the students.
APRES L’ENVOI
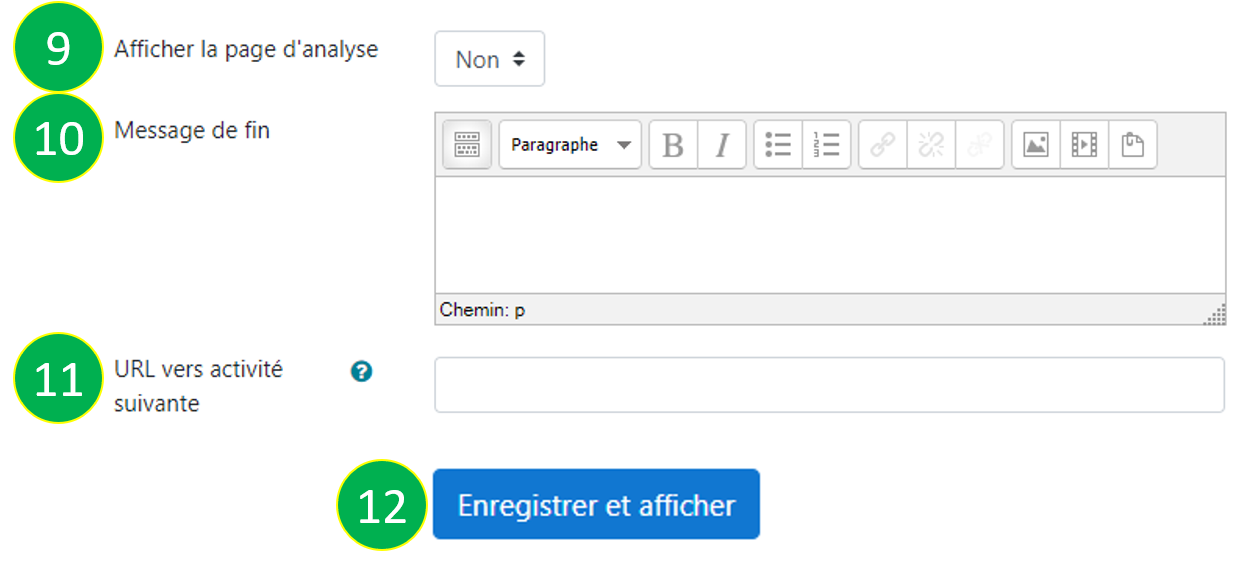
- Afficher la page d’analyse : Choisissez « Oui » ou « Non »
- Si vous choisissez « Yes », les résultats s’affichent pour tous les participants qui ont répondu. Ces résultats s’affichent ainsi : chaque question et ses différentes réponses sans indiquer le nom de l’étudiant même si le choix d’enregistrer le nom du participant a été retenu.
- Si vous choisissez « No », les résultats pourront être vus uniquement par l’enseignant.
- Saisissez un message de fin. À la fin de l’activité, si vous souhaitez que les étudiants soient redirigés ou qu’ils voient un message autre que le message par défaut « Vos réponses ont été enregistrées. Merci. », vous pouvez respectivement mettre un URL dans le champ URL vers activité suivante ou rédiger un texte dans le champ Message de fin.
- Saisissez un URL vers l’activité suivante : lorsqu’ils cliqueront sur le bouton « Continuer » et seront redirigés vers l’URL déterminée
- Cliquez sur le bouton « Save and display "
C. ADDING QUESTIONS
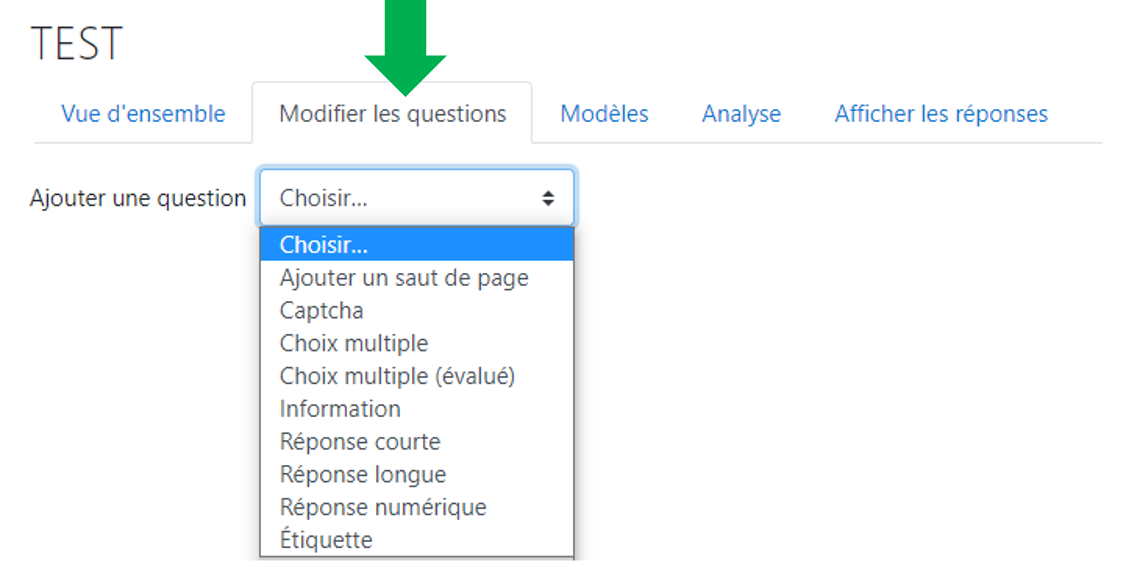
Lorsque vous avez créé et paramétré votre feedback, vous devez y ajouter des questions. Cliquer sur « Modifier les questions » et choisissez un type de question dans le menu déroulant.
Vous pouvez choisir parmi ce type de questions « Choix multiple, Choix multiple évalué, réponse courte, réponse longue et réponse numérique "
It is also possible to choose labels to categorize the questions and page breaks if you want to move each category of questions on a single page.
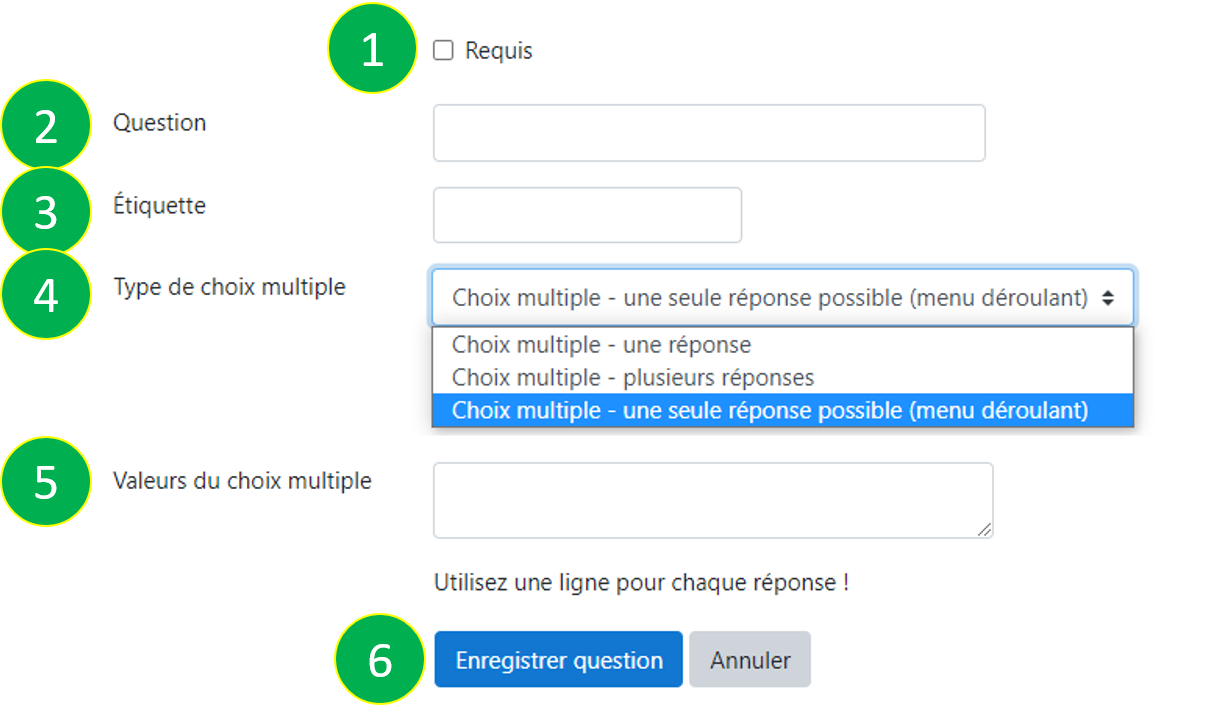
- MULTIPLE CHOICE
- If this box is checked, the question becomes mandatory and feedback cannot be submitted if it remains unanswered.
- Enter your question
- Enter the label of this question
- Multiple choice type: choose one of the following options :
- Multiple choice - single answer
- Multiple choice - multiple answer
- Multiple choice - single answer allowed (drop-down menu)
- Enter the values for the multiple choice by inserting each choice on a line.
- Cliquez sur « Enregistrer question ».
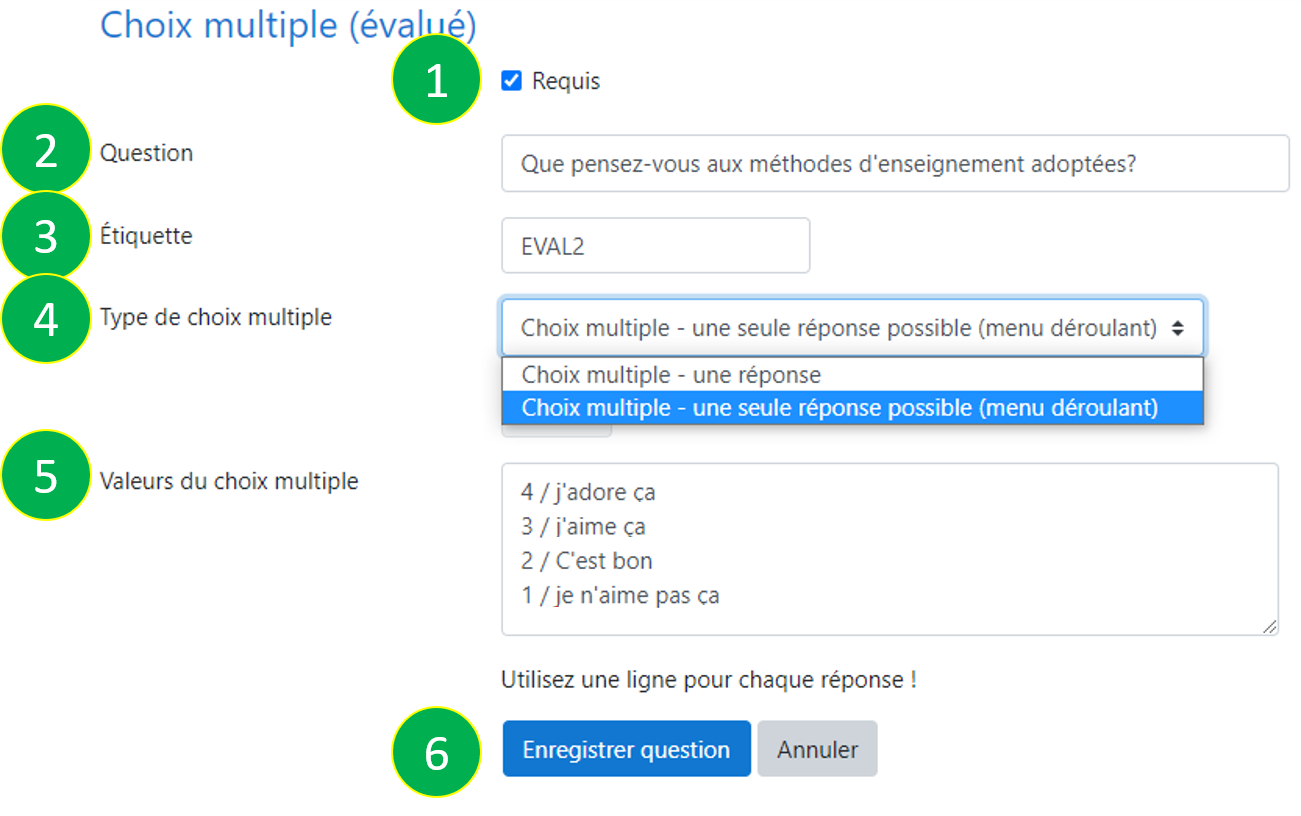
- CHOIX MULTIPLE (ÉVALUÉ/RATING)
- If this box is checked, the question becomes mandatory and feedback cannot be submitted if it remains unanswered.
- Enter your question
- Enter the label of this question
- Multiple choice type: choose one of the following options :
- Multiple choice - single answer
- Multiple choice - single answer allowed (drop-down menu)
- Enter the values for the multiple choice by inserting each choice on a line.
- Cliquez sur « Enregistrer question ».
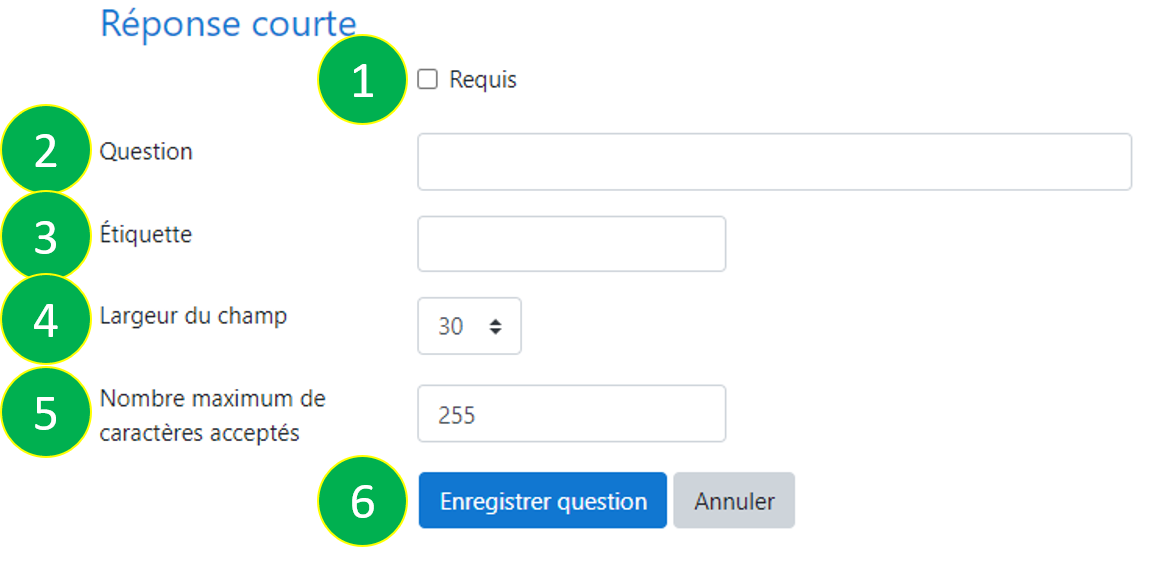
- SHORT TEXT ANSWER
- If this box is checked, the question becomes mandatory and feedback cannot be submitted if it remains unanswered.
- Enter your question.
- Enter the label of this question.
- Enter the width of the field.
- Enter the maximum number of characters accepted.
- Cliquez sur « Enregistrer question ».
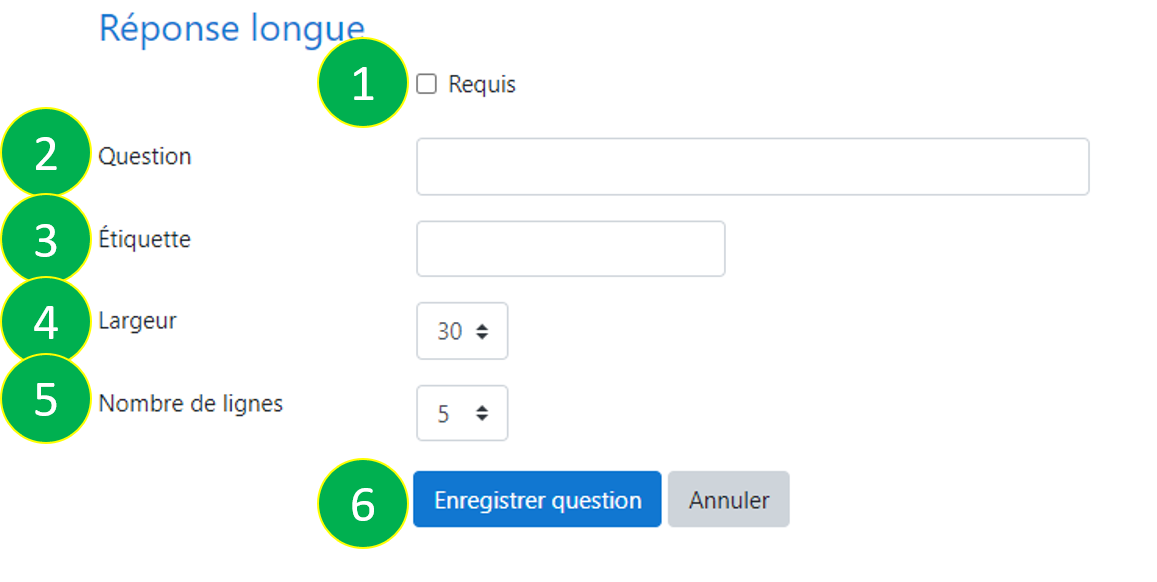
- LONGER TEXT ANSWER
- If this box is checked, the question becomes mandatory and feedback cannot be submitted if it remains unanswered.
- Enter your question.
- Enter the label of this question.
- Enter the width of the field.
- Enter the number of lines.
- Cliquez sur « Enregistrer question ».
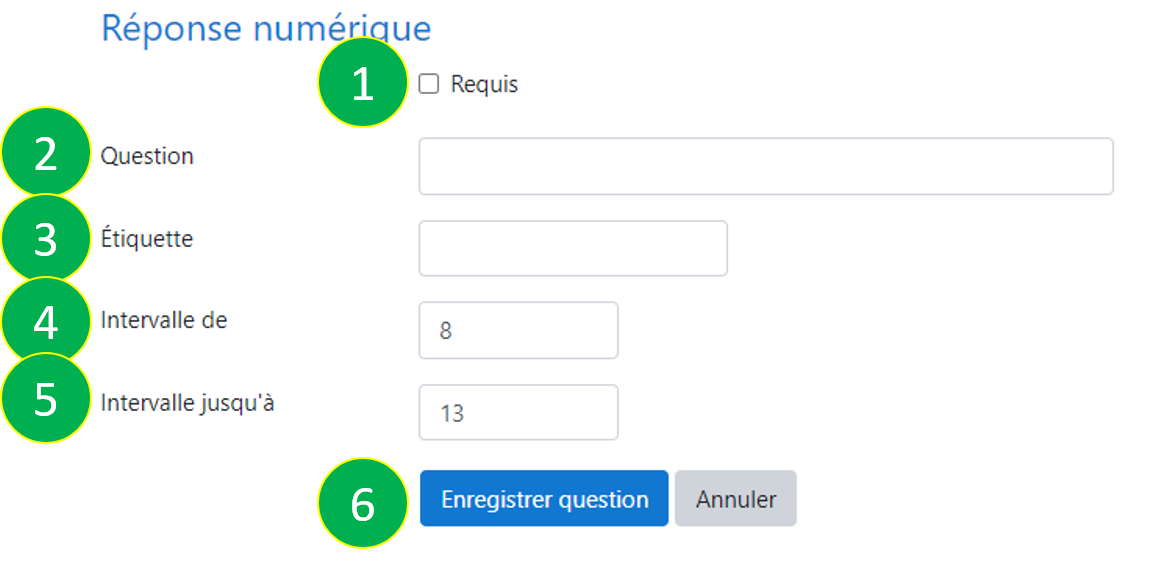
- NUMERIC ANSWER
- If this box is checked, the question becomes mandatory and feedback cannot be submitted if it remains unanswered.
- Enter your question.
- Enter the label of this question.
- Saisissez « l’intervalle de » et « l’intervalle jusqu’à ».
- Cliquez sur « Enregistrer question ».
- LABEL
- Add the contents of the label.
- Cliquez sur « Enregistrer question ».
-
- ADD A PAGE BREAK
Il suffit de choisir « Ajouter un saut de page » dans le champ « Ajouter une question ».
D. SHOW AND EXPORT RESPONSES
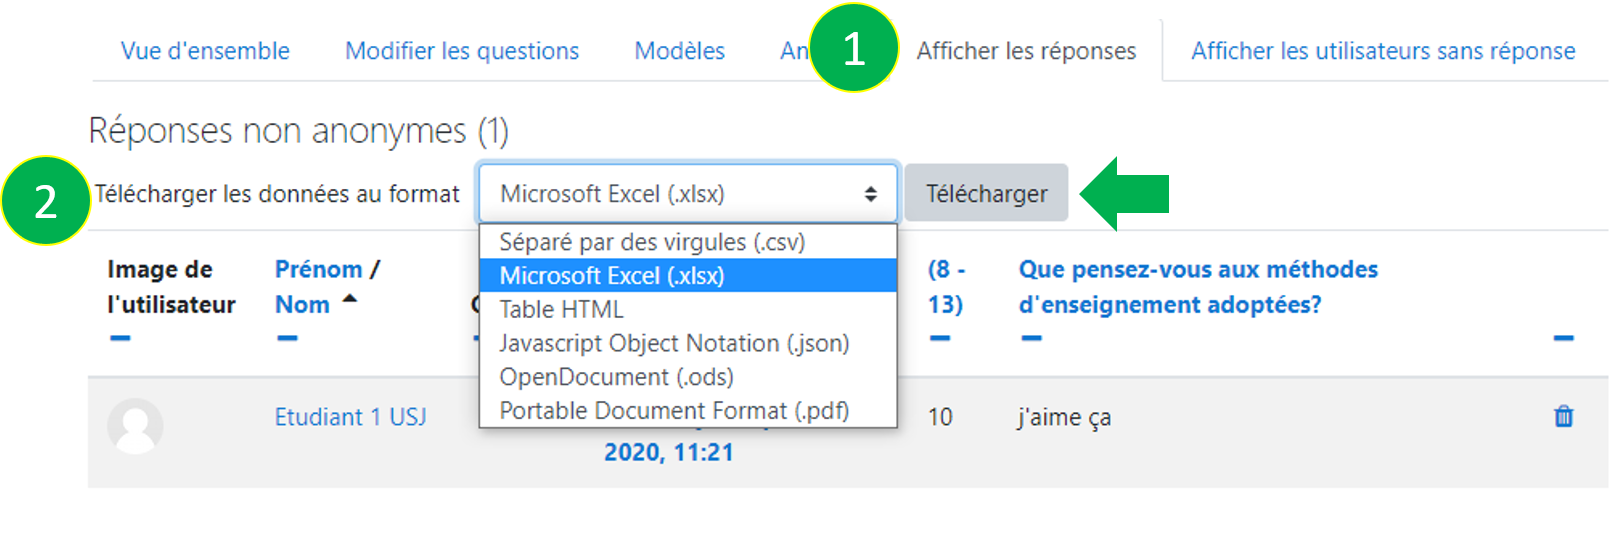
- Pour afficher les réponses des participants il faut cliquer sur « Afficher les réponses "
- Pour exporter les réponses, il faut spécifier le format des données à exporter du menu déroulant et puis cliquer sur « Télécharger ».
The Feedback activity is normally used to do some kind of evaluation of the course by the students. The evaluation can be anonymous when anonymity is activated during the configuration of the Feedback activity.
It is recommended to follow the steps below to ensure the correct approach to the implementation of the “Feedback” activity.
- First of all, you must identify the elements below of the “Feedback” activity (in a Word file)
- The title and a brief description of this activity.(i.e. why to use « Feedback »).
- The title and a brief description of this activity.
- The questions of this Feedback, their types (i.e. short answer, multiple choice etc.), if they are required or not, whether they must be categorized by labels as well as the sequencing of the questions (i.e. question 1, question 2, etc.).
- Questions are displayed on a single page or not (i.e. the Feedback design). If not, specify the corresponding questions for each page.
- If the Feedback preserves anonymity (i.e. you cannot identify which response corresponds to which student).
- The opening and closing dates of this activity.
- Whether multiple discounts are allowed (i.e. students can answer questions multiple times) or not. If multiple discounts are allowed, then you will receive the last discount as a final response.
- Whether the analysis page is displayed or not. If the page is displayed, the results will be accessible to all participants who responded, note that the results are anonymous.
- After having identified the elements of this activity, we move on to the application. You then have to create the Feedback activity, configure it, feed it with questions and work on its design.
- Start the Feedback activity for students to answer questions. After launch, you can view student responses. At the end of the activity, you can download the answers in an Excel file.
Remark : The activity can no longer be edited once a single student provides a response. This is why, and as a good practice, you must make sure that there are no changes to be made to the activity before launching it. However, if a modification is necessary (for example, modify a question, add a question, etc.), in this case, all student responses must be deleted and the activity started again.
A. CREATING THE FEEDBACK ACTIVITY IN YOUR COURSE
- Access your course by clicking on “My courses” label in the “Navigation” block then select your course
- Activate the editing mode by clicking on the « Turn Editing On«
- Create the “Feedback” activity , by clicking on “Add an activity or a resource”
- Choose “Feedback” and click on the “Add” button.

B. SETTINGS OF THE FEEDBACK ACTIVITY
To configure the Feedback activity, follow the steps below :
GENERAL
- Enter a name for your activity
- Enter a description for your activity, which should include specific instructions for students

AVAILABLILITY
This feature allows you to schedule a period of time during which students can respond to feedback.
- Activate the « Allow answers from » field by checking the « Activate » box and then enter the date of your choice. Students will not be able to respond to the Feedback before this date. If you do not activate this field, students will be able to access Feedback all the time.
- Activate the « Allow answers to » by checking the « Activate » box and then enter the date of your choice. Students will not be able to respond to the Feedback after this date. If you do not activate this field, students will be able to access Feedback all the time.

QUESTION AND SUBMISSION SETTINGS
- Choose of the following options :
- Anonymous
- User’s name will be logged and shown with answers (in this case only the teacher can know who answered, while the students cannot know who answered even if they are given access to the results.)
- You can allow multiple submissions, but you will only see the last one.
- You can enable notification of submissions.
- You can auto number questions for the students.

AFTER SUBMISSION
- Show the analysis page: Choose « Yes » or« No »
- If you choose “Yes”, results are displayed for all participants who responded. These results are displayed as follows: each question and its various answers without indicating the name of the student even if the choice to record the name of the participant was retained.
- If you choose « No« , the results can only be seen by the teacher.
- Enter an end message. At the end of the activity, if you want students to be redirected or see a message other than the default « Your answers have been saved. Thank you. » , You can respectively put a URL in the URL to next activity field or write a text in the Completion message field.
- Add a Link to next activity : when they click on the « Continue » button and will be redirected to the determined URL
- Click on the button « Save and display "

C. ADDING QUESTIONS
When you have created and configured your feedback, you need to add questions to it. Click on « Edit questions » and choose a question type from the drop-down menu.
You can choose from this type of question « Multiple choice, Evaluated multiple choice, short answer, long answer and numerical answer "
It is also possible to choose labels to categorize the questions and page breaks if you want to move each category of questions on a single page.

- MULTIPLE CHOICE
- If this box is checked, the question becomes mandatory and feedback cannot be submitted if it remains unanswered.
- Enter your question
- Enter the label of this question
- Multiple choice type: choose one of the following options :
- Multiple choice – single answer
- Multiple choice – multiple answer
- Multiple choice – single answer allowed (drop-down menu)
- Enter the values for the multiple choice by inserting each choice on a line.
- Click on « save question ».

- MULTIPLE CHOICE (RATED)
- If this box is checked, the question becomes mandatory and feedback cannot be submitted if it remains unanswered.
- Enter your question
- Enter the label of this question
- Multiple choice type: choose one of the following options :
- Multiple choice – single answer
- Multiple choice – single answer allowed (drop-down menu)
- Enter the values for the multiple choice by inserting each choice on a line.
- Click on « Save question ».

- SHORT TEXT ANSWER
- If this box is checked, the question becomes mandatory and feedback cannot be submitted if it remains unanswered.
- Enter your question.
- Enter the label of this question.
- Enter the width of the field.
- Enter the maximum number of characters accepted.
- Click on « Save question ».

- LONGER TEXT ANSWER
- If this box is checked, the question becomes mandatory and feedback cannot be submitted if it remains unanswered.
- Enter your question.
- Enter the label of this question.
- Enter the width of the field.
- Enter the number of lines.
- Click on « Save question ».

- NUMERIC ANSWER
- If this box is checked, the question becomes mandatory and feedback cannot be submitted if it remains unanswered.
- Enter your question.
- Enter the label of this question.
- Enter “Range from” and “Range to”.
- Click on « Save question ».

- LABEL
- Add the contents of the label.
- Click on « Save question ».
-
- ADD A PAGE BREAK
All you have to do is choose “Add a page break” in the “Add a question” field.
D. SHOW AND EXPORT RESPONSES
- To display the responses of the participants, click on « Show responses«
- To export the responses, you must specify the format of the data to be exported from the drop-down menu and then click on « Download« .

CINIA is located on the 7th floor of the USJ Human Sciences Campus on Damascus Street in Beirut.
Do not hesitate to contact us at cinia@usj.edu.lb
or call us at +961 1 421 000 extension 5923/5924.
© 2025 Center for Digital Innovation and AI. Created for free using WordPress and Kubio

